Introduction
I happened to show a version of the raindrop simulation to Jim Campbell back in 2003, and he thought it would fit right into a project he'd been contemplating. He conceived the project as a set of image transformations based on weather phenomena, running as a screensaver, and the raindrop simulation would be one such transformation. Jim decided to create a teaser for the project by having me implement the simulation as a screensaver, hoping to get funding for the rest of the work. During the course of the implementation, Jim helped tighten the simulation and suggested using the inverted background image to form each drop. Since it was a teaser, I only built it as a screensaver on Windows (there is a Macintosh version as a standalone application) and didn't worry about any kind of optimization (including file size). Unfortunately, further funding has not been forthcoming, but Jim has graciously consented to make the screensaver available for free download.
Thanks are also to due to Eric Hulteen, Rachel Strickland, Russell Zeidner,Yin Yin Wong, Durrell Bishop, and Meg Withgott for their encouragement, help, and suggestions along the way.
If you're interested in the simulation, but don't want the screensaver, click here for a version that will run in a browser (Flash 8 or later plug-in required).
Please note (
This software is distributed in good faith, but as-is. Jim and I are not responsible if it doesn't work correctly, crashes, or flips out your system. There is no support for it, and it's unlikely that any future versions will be built.
Installation instructions (Windows) (
Click here to download the Windows screensaver, and save the file (raincheck.zip) to your hard drive. Raincheck.zip contains two files: raincheck.exe and raincheck.scr. Under Windows XP, copy raincheck.exe and raincheck.scr into your Windows/System32 folder. For earlier Win OS versions, look at Windows/System32 or Windows/System for other .scr files, and copy the raincheck files to that folder. Under Win '98, for example, you'll copy the files into Windows/System. The screensaver has not been tested under anything earlier than Win '98.
Once the two files have been copied, bring up the Display Control Panel, and select the Screen Saver tab. On that page, under the Screen Saver label, there is a drop-down menu, situated to the left of Settings and Preview buttons. Using the drop-down, select raincheck. Next, click the settings button, and in the settings window, click the select image file... button. You can choose a bmp, png, jpg, or tif image. Optionally, modify the other settings. Close the settings window, and click the preview button to test it out.
Installation instructions (Macintosh, OSX only)
Click here to download the Macintosh application, and save the file (raincheck.osx.hqx) to your hard drive. Raincheck.osx.hqx is an archive file that contains a single file, raincheck.osx, which you can copy anywhere you like. Double-click raincheck.osx to start it up. It will first display a settings dialog, and once that's dismissed, the simulation will begin. Your settings are saved to a file, so you won't need to re-enter them next time you launch raincheck.
Using raincheck Us
On Windows, when the screensaver is running, move the mouse or press any key to exit. On the Macintosh, use the Escape key.
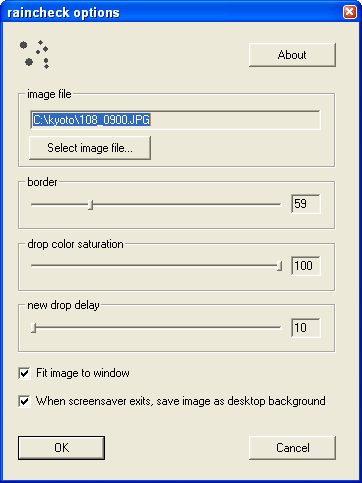
This is a screen shot from the Windows version. The Mac control panel is similar, with one exception noted below.
Select image file chooses the background image over which the raindrops fall. The raindrops are constructed from the same image.
Border is the black area around the perimeter of the image. If border is zero, drops will only appear within the image. If the border is greater than zero, drops will appear in the perimeter to the border value you set. If your image is larger than the screen, border will effectively be zero, regardless of the setting.
Drop color saturation. The higher the saturation, the more color in the drop. This feature was part of Jim's original screensaver concept.
New drop delay more-or-less controls how hard it is raining.
Fit image to window applies to images larger than the screen. If this is checked, large images will be scaled to fit into the screen area.
Another feature from Jim's original concept is that when it quits, it captures a snapshot of the screen and saves it as the desktop background image. You can turn this feature off using the When screensaver exits checkbox. Screen capture is not implemented in the Macintosh version.